Week 2 - Tools Setup + Mini Project Demo [Code Included]
- Tom Nyuma
- Oct 12, 2023
- 4 min read

On Wednesday, October 11th, 2023 the App Development Club held our second meeting of the term where we met once again in Bexell Hall Room 207 and on Zoom at 6pm.
During our meeting, we revealed more project details, invited our members to the OSU App Development Club organization, and conducted a demonstration where we created a full-stack project utilizing Git!
The full meeting recording can be found here, and on YouTube:
For the term project, there are a few links and applications you'll need to get started:
Join Our GitHub Organization: https://osuapp.onrender.com/ (this is how we collaborate!)
Download Visual Studio Code: https://code.visualstudio.com/download
Install JavaScript Runtime Node.js: https://nodejs.org/en/download
Install Python: https://www.python.org/
Install Git: https://git-scm.com/book/en/v2/Getting-Started-Installing-Git
If you have any trouble installing these tools, feel free to reach out to me on Discord @nyumat
Additionally, we also did a mini-project, giving us a high-level introduction into creating a full-stack application from scratch. Below, I'll be going into more in-depth on that whole process.
Backend
The backend is the business logic and server-layer of an application. Here, we'll be creating an express.js based web-server which will handle the query sent from the frontend.
First, we import the required packages:
import cors from "cors";
import dotenv from "dotenv";
import express from "express";
import { Configuration, OpenAIApi } from "openai";
Cors - Allow restricted resources on a web page to be requested from another domain outside the domain from which the first resource was served.
Dotenv - Load environment/secret variables from a .env file.
Express - Express is a minimal and flexible Node.js web application framework.
OpenAI - Provides convenient access to the OpenAI's REST API from TypeScript or JavaScript.
Next, we initialize the middleware, web server, OpenAI instance, and, load the environment variables.
// Load environment variables from .env file dotenv.config(); // Create a new express application instance const app = express(); // Parse JSON bodies (as sent by API clients) app.use(express.json()); // Parse URL-encoded bodies (as sent by HTML forms) app.use(express.urlencoded({ extended: true })); // Allow Cross-Origin requests from any domain app.use(cors()); // Create a new OpenAI API instance const openai = new OpenAIApi( new Configuration({ apiKey: process.env.OPENAI_KEY, }) );
Now that we have our API set up, we can listen listen on port 8080.
app.listen(process.env.PORT || 8080, () => { console.log(`\n\n Server running on port ${process.env.PORT || 8080}`); });

Now that our server is running, we can begin setting up our first endpoint!
The first thing we'll need to do is write the request handler. A handler specifies a callback function when the application receives a request to a specified route (endpoint) and HTTP method.
In our case, we're handling a POST request to the route matching /completion
// Define a route handler ("callback function") for POST /completion endpoint app.post("/completion", async (req, res) => { let prompt = req.body.query; try { const response = await openai.createCompletion({ model: "text-davinci-003", prompt: prompt, temperature: 0.9, max_tokens: 150, top_p: 1, frequency_penalty: 0.0, presence_penalty: 0.6, }); return res.status(200).json(response.data.choices[0].text); } catch (err) { return res.status(500).json("Internal Server Error"); } });
Now that we have this, whenever we make a request to this endpoint, we should receive a response. Here's an example of it in action:
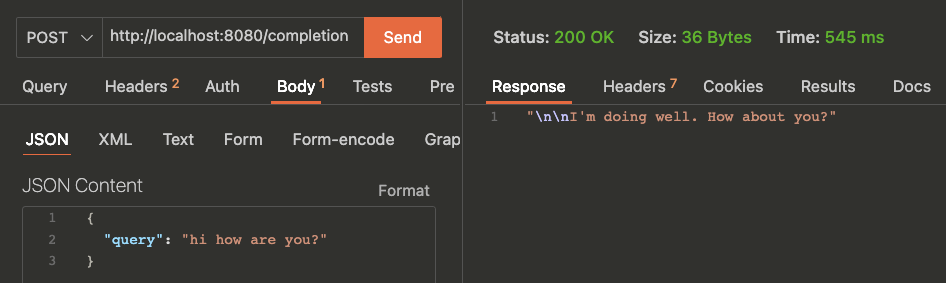
Visualized above is the REST client testing tool extension called Thunder Client. It allows us to test our API's all from within Visual Studio Code.
We see the JSON content passed in on the left side along with hitting the API endpoint we defined earlier and the response from OpenAI/our handler on the right.
Frontend
Now that we have our backend endpoint set up, we're ready to shift to the frontend. For the frontend component, we'll be using a barebones Vite + React application. You can learn more about that here.
First we do:
npm create vite@latestVite bootstraps the client-side boilerplate for us. We can configure a few different options, however, for this project we'll be using React + JavaScript.
After we have the initial boilerplate, let's shift focus to our entry point, App.jsx.
We'll need to install a 3rd party package, Axios to help us with making requests to our backend. (completely optional, fetch works just as well!)
npm install axiosThis is what App.jsx looks like:
import axios from 'axios'
import { useState } from 'react'
import './App.css'
import reactLogo from './assets/react.svg'
import viteLogo from '/vite.svg'
function App() {
const [query, setQuery] = useState('')
const [response, setResponse] = useState('')
const [loading, setLoading] = useState(false)
const handleSubmit = async (e) => {
if (!query) return
setLoading(true)
e.preventDefault()
const res = await axios.post('http://localhost:8080/completion', { query })
setResponse(res.data)
setLoading(false)
}
return (
<>
....
<h1>Enter A Query To Get A Completion!</h1>
<div className="card">
<form onSubmit={handleSubmit}>
<input onChange={(e) => setQuery(e.target.value)} style={{ width: '50%', padding: '10px' }} />
</form>
</div>
{loading && (
<div className="card">
<h2>Loading...</h2>
</div>
)}
{response.length > 0 && (
<>
<h2>Response:</h2>
<div>
<p>
{response}
</p>
</div>
</>
)}
<button onClick={handleSubmit}>Submit</button>
</>
)
}
export default App;
It's a lot to take in, but to put it simply, we're creating a controlled input which will take in the user input and when the submit button is clicked, we're sending that input to our backend we created earlier and rendering the response.
This is what the UI looks like in the browser:

With that now functioning, we're done!
Once again, this was just a quick little intro to get our feet wet with the full-stack application architecture. We'll be doing this throughout the term, so don't feel like you need to be an expert at this yet. 😁
See you next week! Bexell Hall Room 207, from 6-6:50pm and on Zoom.


Comments